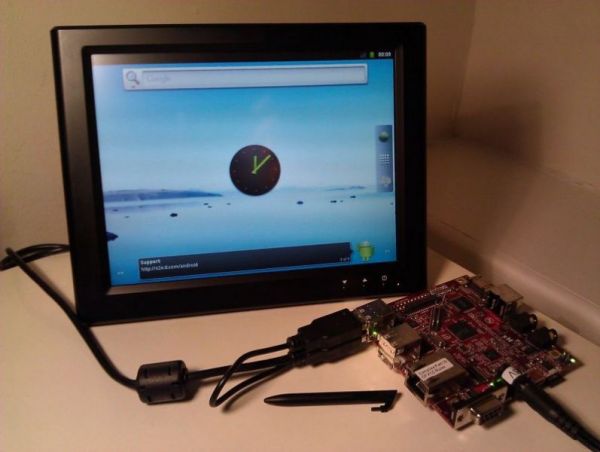
For one of my university projects I was working on a Beagleboard and managed to install an Android system that runs on a USB DisplayLink touchscreen. The setup was a Lilliput UM-80/C/T DisplayLink screen connected to a Beagleboard xM running the TI Android DevKit 2.1 build.

Installing a pre-built image
Starting point is a clean pre-built image. It allows us to check that our hardware is set up correctly and, more importantly, provides the full Android filesystem and a configured boot loader. With this, we can simply build and swap out single components without rebuilding the whole Android platform. The pre-built image can be downloaded here.
Running
~/prebuilt # sudo sh mkmmc-android.sh /dev/sdc
(with /dev/sdc/ being the SD card) will install the pre-build image.
After inserting the SD card and powering up the system, it might be a good idea to check the boot messages over the serial console to make sure everything went ok. Note that the first boot usually takes several minutes.
Building from clean source
Now we can start building components. Again it is a good idea to make sure it is not the provided files that cause trouble. So we start off with a clean build from the sources. They can be downloaded here.
The only part of the system that needs to be modified is the kernel. To compile it, we need a build configuration. It can be pulled from the device running the pre-built image.
~/workspace/kernel # adb pull /proc/config.gz .
~/workspace/kernel # cat config.gz | gunzip > .config
~/workspace/kernel # rm config.gz
Now the kernel is ready. Running
~/workspace/kernel # make ARCH=arm CROSS_COMPILE=arm-eabi- uImage
will build it and create a uImage which then can then be copied to the boot partition on the SD card.
~/workspace/kernel # cp arch/arm/boot/uImage /media/boot/uImage
Adding DisplayLink driver to the kernel
Now it is time to add the DisplayLink driver to the kernel. Newer Linux kernels come with the staging DisplayLink driver udlfb. But this driver does not support page flipping, a feature that is mandatory for Android.There is a port for older Android versions that has implemented this feature in an older udlfb driver (download the kernel.tgz at the bottom of the page). The easiest way is to just replace the staging driver with the port in the source tree.
~/Downloads # rm -r ~/workspace/kernel/drivers/staging/udlfb
~/Downloads # tar -xvf kernel.tgz
~/Downloads # mv drivers/video/udlfb ~/workspace/kernel/drivers/staging/udlfb
This driver does not support the 800 x 600 resolution of the Lilliput UM-80/C/T used in this setup. A patch can add more modes.
To include the driver in the next build, the following kernel configuration value needs to be set in the .config file:
CONFIG_FB_UDL=y
Now the kernel can be rebuilt and transferred to the SD card.
~/workspace/kernel # make ARCH=arm CROSS_COMPILE=arm-eabi- uImage
~/workspace/kernel # cp arch/arm/boot/uImage /media/boot/uImage
Testing the driver
The attached screen should now show a green screen indicating that the driver is loaded and the device is initialised once the system boots up.
This will also create a second framebuffer device node. Running
# adb shell
root@android:/ # cd /dev/graphics
root@android:/dev/graphics/ # ls
should now list fb0 and fb1.
Sven Killig wrote a small application that is perfect for testing the screen. Send to Framebuffer uses the Action.SEND intent to send an image from the gallery app directly to the second framebuffer device /dev/graphics/fb1, which is now the DisplayLink screen. In order to do that, it needs permission to access the framebuffer.
root@android:/ # chmod 666 /dev/graphics/fb1
Now the screen can be testet by clicking the share button when viewing a gallery app and selecting “Framebuffer”.
Setting the DisplayLink screen as primary output
Unfortunately Android does not support primary display selection. The relevant platform components are hard coded to use the primary framebuffer device /dev/graphics/fb0 as default output which in this case is the Beagleboard’s on-board OMAP framebuffer.
One way to solve this issue is to change the hard coded lines in the Android platform sources from fb0 to fb1. But the OMAP drivers use a modified closed source version of Android’s Graphics Memory Allocator Module (gralloc), which contains some of the affected code lines.
So the only alternative without modifying drivers is to use Android’s default gralloc module and to disable the on-board graphics chip so that the attached DisplayLink device is recognised as the primary (and only) output device. Unfortunately this also means disabling the hardware acceleration, so it is not an optimal solution.
Disabling the OMAP framebuffer in the kernel
he OMAP graphics subsystem for the kernel can be disabled by changing
CONFIG_OMAP2_DSS=y
to
# CONFIG_OMAP2_DSS is not set
in the .config file and rebuilding the kernel.
Removing files and configurations
Even after removing it from the kernel, the Android build still tries to load the SGX graphics driver for the OMAP chip.
The init.rc script in the root directory of the rootfs partition tries to start a service that belongs to the graphics driver. Following line must be deleted:
service pvr /system/bin/sgx/rc.pvr start
And other remaining files need to be removed:
~ # rm -r /media/rootfs/system/bin/sgx
~ # rm -r /media/rootfs/lib/hw/gralloc.omap3.so
~ # rm -r /media/rootfs/lib/hw/gralloc.omap3.so.1.1.17.4352
~ # rm -r /media/rootfs/lib/egl/libEGL_POWERVR_SGX530_125.so
~ # rm -r /media/rootfs/lib/egl/libEGL_POWERVR_SGX530_125.so.1.1.17.4352
~ # rm -r /media/rootfs/lib/egl/libGLESv1_CM_POWERVR_SGX530_125.so
~ # rm -r /media/rootfs/lib/egl/libGLESv1_CM_POWERVR_SGX530_125.so.1.1.17.4352
~ # rm -r /media/rootfs/lib/egl/libGLESv2_POWERVR_SGX530_125.so
~ # rm -r /media/rootfs/lib/egl/libGLESv2_POWERVR_SGX530_125.so.1.1.17.4352
Links and references
- DisplayLink for Android (udlfb port with double buffering support)
- udlfb patch to support more resolutions
- Sven Killig’s project site (with Send to Framebuffer download)
- TI Android GingerBread DevKit 2.1 Porting Guide
- TI Android GingerBread DevKit 2.1 Developer Guide
- TI Android GingerBread DevKit 2.1 User Guide
- TI Android GingerBread DevKit 2.1 download page
- rowboat project (Android port used for TI Android DevKits)